iyihua

  • 首页

  • 标签

  • 分类

  • 归档

使用Jenkins配置Git和Maven的自动化构建Tomcat项目

发表于 2016-05-30 | 更新于 2019-05-22 | 分类于 deploy

0- 前置条件

安装jdk和tomcat
我这里选择同一台服务器安装两个tomcat,一个tomcat作为Jenkins的容器,另外一个tomcat作为简单mvc项目的部署服务器。
Jenkins服务器使用8080端口,mvc项目tomcat使用8081端口。

1 - 部署Jenkins

官网下载http://jenkins-ci.org/
我下载的是最新的2.5版本
下载得到一个jenkins.war的war包
可以直接使用java -j jenkins.war运行,或者把war包放到tomcat运行
我这里是放到tomcat,启动tomcat即可.
启动后可以在http://localhost:8080/jenkins/,看到Jenkins已经在运行
第一次进入,需要你输入一个key,会提示您在/root/.jenkins/…某个路径下找到
进入后会提示你安装一些插件,根据需要安装即可,或者直接安装它提供的一键建议安装.

2 - 安装相关插件

我这里需要git plugin和maven plugin,可以在插件管理处搜索安装。
这两个基本是默认安装好了的.

3 - 安装git和maven

安装git

1
yum install git

安装maven

1
2
3
4
5
6
7
8
9
10
11
12
13
14
15
16
17
18
19
20
21
22
23
24
25
26
27
28
29
1、官网找到最新版的安装包:
http://maven.apache.org/download.cgi

拷贝文件名为 *-bin.tar.gz 的链接地址;

2、下载
# wget http://mirrors.hust.edu.cn/apache/maven/maven-3/3.3.3/binaries/apache-maven-3.3.3-bin.tar.gz

3、解压
# tar xvf apache-maven-3.3.3-bin.tar.gz

如果需要:移动到其他目录
建立软连接:# ln -s apache-maven-3.3.3 maven

4、配置环境变量
# vi /etc/profile
export M2_HOME=/usr/local/apache-maven
export PATH=$PATH:$M2_HOME/bin

# source /etc/profile

5、验证是否安装成功
# mvn -version
Apache Maven 3.3.3 (7994120775791599e205a5524ec3e0dfe41d4a06; 2015-04-22T19:57:37+08:00)
Maven home: /opt/app/maven
Java version: 1.8.0_51, vendor: Oracle Corporation
Java home: /usr/java/jdk1.8.0_51/jre
Default locale: zh_CN, platform encoding: UTF-8
OS name: "linux", version: "3.10.0-229.el7.x86_64", arch: "amd64", family: "unix"

4 - 配置jdk和maven路径等

选择”系统管理” -> “Global Tool Configuration”
在里面配置好jdk,maven的路径,只需要配置它们的根路径.

5 - 创建任务,配置项目信息

选择“新建”,填写项目任务名,并选择“构建一个maven项目”,保存.
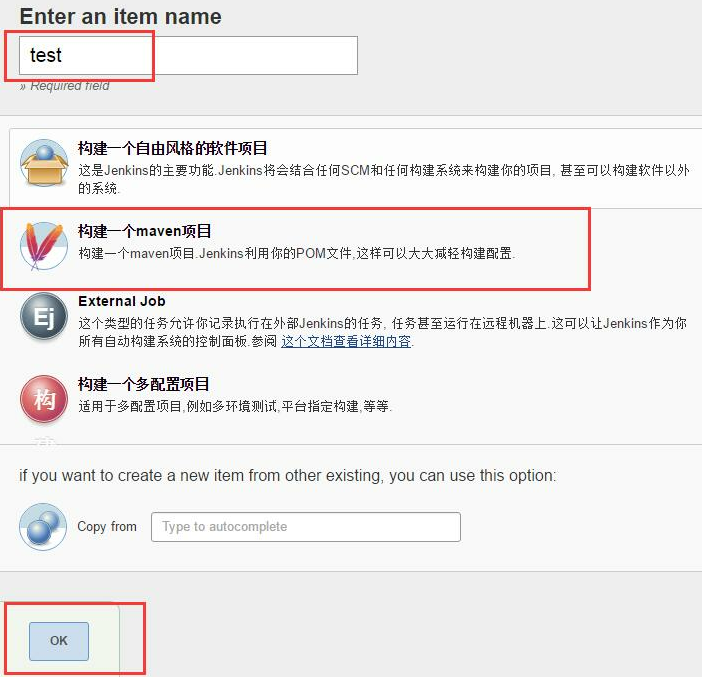
进入项目配置.
填写项目名称
填写Repository URL
我这里使用的是一个git上的一个建议springmvc项目
https://github.com/bingyue/easy-springmvc-maven
如果需要,也可以配置一下构建后发送邮件到您的邮箱

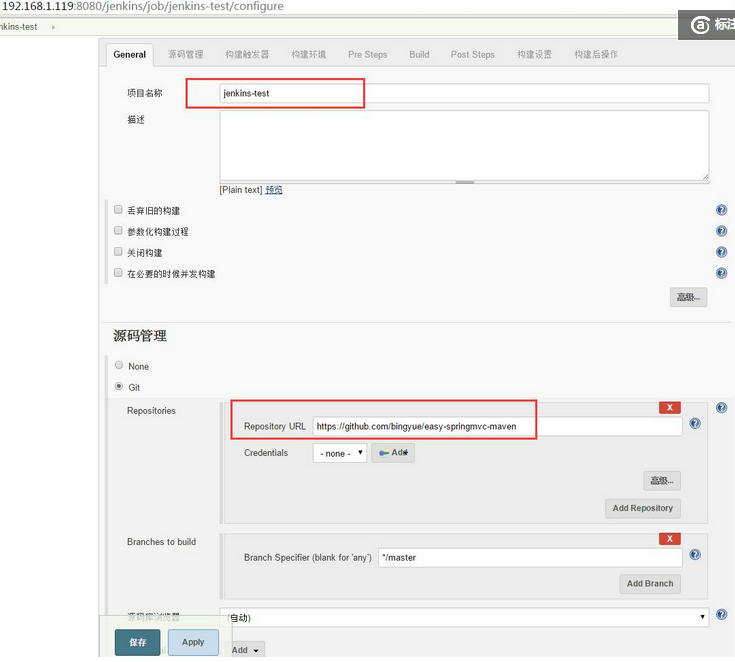
6 - 配置构建成功后的动作,添加shell


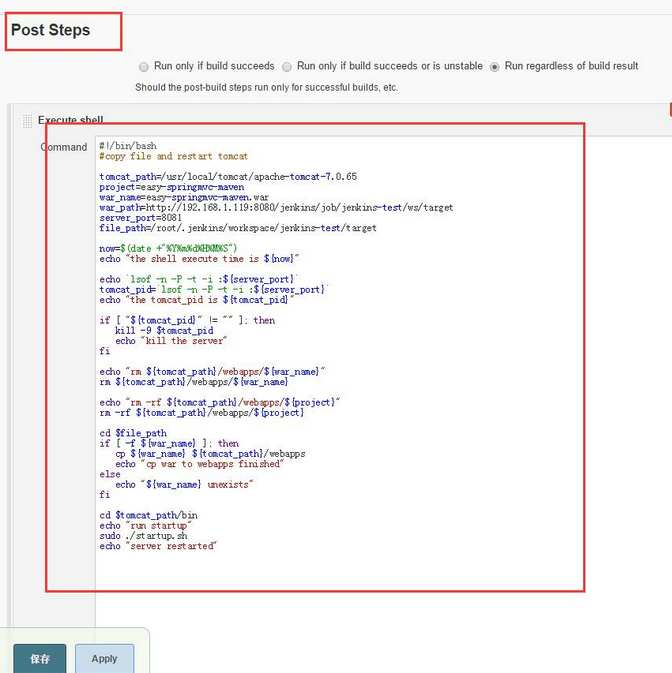
配置项目中的“Post Steps”,设置构建完成后的动作.
这里我设置为将war包拷贝到Tomcat目录,删除项目原来的内容文件夹,并重启Tomcat。
选择Run only if build succeeds or is unstable ,点击添加Execute Shell:
shell脚本:

1
2
3
4
5
6
7
8
9
10
11
12
13
14
15
16
17
18
19
20
21
22
23
24
25
26
27
28
29
30
31
32
33
34
35
36
37
38
39
40
#!/bin/bash
#copy file and restart tomcat

tomcat_path=/usr/local/tomcat/apache-tomcat-7.0.65
project=easy-springmvc-maven
war_name=easy-springmvc-maven.war
war_path=http://192.168.1.119:8080/jenkins/job/jenkins-test/ws/target
server_port=8081
file_path=/root/.jenkins/workspace/jenkins-test/target

now=$(date +"%Y%m%d%H%M%S")
echo "the shell execute time is ${now}"

echo `lsof -n -P -t -i :${server_port}`
tomcat_pid=`lsof -n -P -t -i :${server_port}`
echo "the tomcat_pid is ${tomcat_pid}"

if [ "${tomcat_pid}" != "" ]; then
kill -9 $tomcat_pid
echo "kill the server"
fi

echo "rm ${tomcat_path}/webapps/${war_name}"
rm ${tomcat_path}/webapps/${war_name}

echo "rm -rf ${tomcat_path}/webapps/${project}"
rm -rf ${tomcat_path}/webapps/${project}

cd $file_path
if [ -f ${war_name} ]; then
cp ${war_name} ${tomcat_path}/webapps
echo "cp war to webapps finished"
else
echo "${war_name} unexists"
fi

cd $tomcat_path/bin
echo "run startup"
sudo ./startup.sh
echo "server restarted"

我这里是在/usr/local/tomcat/apache-tomcat-7.0.65
这个路径下配置了另外一个tomcat来运行测试的web项目.
shell脚本启动tomcat的命令”./startup.sh”,注意要使用sudo

7 - 运行构建项目

打开项目的主面板,直接点击绿色的运行任务构建按钮。

done!

8 - 其他

这个例子使用了同一台服务器部署Jenkins和实际项目。
实际应用则常用法是Jenkins单独部署,
所有别的要部署的项目,自己拥有服务器,为每个项目都创建Jenkins任务,在项目编译成功后,到Jenkins服务器下载编译好的部署包,然后依旧使用shell脚本完成这一切。
并且,可以为不同的部署环境配置不同的任务。一切都是可以定制的。

java static 关键字总结

发表于 2016-05-09 | 更新于 2019-05-22 | 分类于 java

总结:

1.

修饰方法时,表示该方法是静态方法,表示该类的该方法可以不产生实例而直接通过类名加方法名的方法去执行该静态方法;

2.

修饰变量时,表示该变量是静态变量,在java里可以理解为静态变量全局变量。
该类的所有实例共享此静态变量,类装载时,只会分配一块存储空间,所有此类对象可以操作此块存储空间。
也就是说,static修饰的静态变量也是可以直接通过类名加变量名直接使用的

3.

普通类不允许被声明为静态的,只有一个内部类可以。
被声明为静态的内部类,可以直接作为一个普通类来使用,而不需要一个外部类了。

详述:

1.

static表示“全局”或者“静态”的意思,用来修饰成员变量和成员方法,也可以形成静态static代码块,但是Java语言中没有全局变量的概念。

 被static修饰的成员变量和成员方法独立于该类的任何对象。也就是说,它不依赖类特定的实例,被类的所有实例共享。只要这个类被加载,Java虚拟机就能根据类名在运行时数据区的方法区内定找到他们。因此,static对象可以在它的任何对象创建之前访问,无需引用任何对象。

 用public修饰的static成员变量和成员方法本质是全局变量和全局方法,当声明它类的对象时,不生成static变量的副本,而是类的所有实例共享同一个static变量。

 static 变量前可以有private修饰,表示这个变量可以在类的静态代码块中,或者类的其他静态成员方法中使用(当然也可以在非静态成员方法中使用–废话),但是不能在其他类中通过类名来直接引用,这一点很重要。实际上你需要搞明白,private是访问权限限定,static表示不要实例化就可以使用,这样就容易理解多了。static前面加上其它访问权限关键字的效果也以此类推。

 static修饰的成员变量和成员方法习惯上称为静态变量和静态方法,可以直接通过类名来访问,访问语法为:
类名.静态方法名(参数列表…)
类名.静态变量名

 用static修饰的代码块表示静态代码块,当Java虚拟机(JVM)加载类时,就会执行该代码块(用处非常大,呵呵)。

2.static变量

 按照是否静态的对类成员变量进行分类可分两种:一种是被static修饰的变量,叫静态变量或类变量;另一种是没有被static修饰的变量,叫实例变量。两者的区别是:
 对于静态变量在内存中只有一个拷贝(节省内存),JVM只为静态分配一次内存,在加载类的过程中完成静态变量的内存分配,可用类名直接访问(方便),当然也可以通过对象来访问(但是这是不推荐的)。
 对于实例变量,没创建一个实例,就会为实例变量分配一次内存,实例变量可以在内存中有多个拷贝,互不影响(灵活)。

3.static方法

 静态方法可以直接通过类名调用,任何的实例也都可以调用,因此静态方法中不能用this和super关键字,不能直接访问所属类的实例变量和实例方法 (就是不带static的成员变量和成员成员方法),只能访问所属类的静态成员变量和成员方法。因为实例成员与特定的对象关联!这个需要去理解,想明白其中的道理,不是记忆!!!
 因为static方法独立于任何实例,因此static方法必须被实现,而不能是抽象的abstract。

[java][enum]典型用法

发表于 2016-05-08 | 更新于 2019-05-22 | 分类于 java

java enum典型用法

代码:

1
2
3
4
5
6
7
8
9
10
11
12
13
14
15
16
17
18
19
20
21
22
23
24
25
26
27
28
29
30
31
32
33
34
35
36
37
38
package com.iyihua.model.enums;

import java.util.HashMap;
import java.util.Map;

public enum GroupType {

CATEGORY(0, "category"), PROJECT(1, "project"), LOCATION(2, "location" );

private final int id;
private final String key;

GroupType(int id, String key) {
this. id = id;
this. key = key;
}

public int getId() {
return id;
}
public String getKey() {
return key;
}

private static final Map<String, GroupType> keyToEnum = new HashMap<String, GroupType>();
static {
for (GroupType gt : GroupType. values())
keyToEnum.put(gt .getKey(), gt );
}

public static GroupType fromString(String symbol) {
return keyToEnum.get(symbol );
}

public static void main(String[] args) {
System. out.println( fromString("category"));
}
}

说明:

代码中把枚举值对应的string-枚举放到了一个map keyToEnum中,并且是静态化的。
如此就可以通过fromString方法,传入key string值,即可返回对应的enum值

[java][design-pattern]java设计模式之Builder模式

发表于 2016-05-08 | 更新于 2019-05-22 | 分类于 java

java设计模式之Builder模式

设计模式模式很多,实际常用的很少。
《Effective Java》这本书里提到过的一种模式builder模式,个人认为非常值得推荐。
假设有一个entity(Entity),有id,name两个字段,如下:

1
2
3
4
5
6
7
8
9
10
11
12
13
14
15
16
17
package demo;
public class Entity {
private int id;
private String name;
public int getId() {
return id;
}
public void setId(int id) {
this.id = id;
}
public String getName() {
return name;
}
public void setName(String name) {
this.name = name;
}
}

为了不用每次初始化的时候,要一个一个的setxxx设置字段值,通常我们会创建构造函数,通过构造函数直接传入字段,初始化。
加入构造函数的实体代码如下:

1
2
3
4
5
6
7
8
9
10
11
12
13
14
15
16
17
18
19
20
21
22
23
24
public class Entity {
private int id;
private String name;
public Entity() {
super();
}
public Entity(int id, String name) {
super();
this.id = id;
this.name = name;
}
public int getId() {
return id;
}
public void setId(int id) {
this.id = id;
}
public String getName() {
return name;
}
public void setName(String name) {
this.name = name;
}
}

然后需要初始化实体的时候,我们这样做:

1
Entity entity = new Entity(1, "name");

这种用法很常用,但是问题来了。
当实体Entity的字段需要增加变化的时候怎么办呢?
比如增加字段descr,这样构造函数和客户端初始化都需要更新:
实体增加:

1
2
3
4
5
6
7
8
9
10
11
12
13
private String descr;
public String getDescr() {
return descr;
}
public void setDescr(String descr) {
this.descr = descr;
}
public Entity(int id, String name, String descr) {
super();
this.id = id;
this.name = name;
this.descr = descr;
}

然后原来调用构造函数初始化的代码也需要改动:

1
Entity entity = new Entity(1, "name", "descr");

如果你的class是不确定的参数,后续可能经常变动,那么你的构造函数可能需要很多个,并且不停的变动,而且,构造函数参数多的时候,参数也很不容易记住。

而Effective Java中则推荐一种builder模式来进行实体初始化
如下:

1
2
3
4
5
6
7
8
9
10
11
12
13
14
15
16
17
18
19
20
21
22
23
24
25
26
27
28
29
public class Entity {
private int id;
private String name;
private String descr;
public static class Builder {
private int id;
private String name;
private String descr;
public Builder(int id) {
this.id = id;
}
public Builder name(String name) {
this.name = name;
return this;
}
public Builder descr(String descr) {
this.descr = descr;
return this;
}
public Entity build() {
return new Entity(this);
}
}
private Entity(Builder b) {
this.id = b.id;
this.name = b.name;
this.descr = b.descr;
}
}

初始化实例的时候,如下:

1
Entity entity = new Entity.Builder(10).name("name").descr("descr").build();

这样的写法,好处是,假如实体Entity以后变化很大,加入很多字段,不会影响到之前客户端初始化的代码,而且,这个初始化的过程非常清晰简单。

java-web知识体系

发表于 2016-05-04 | 更新于 2019-05-22 | 分类于 java

一张java web知识体系思维导图

就是稍微旧了点

springmvc rest api versioning

发表于 2016-05-03 | 更新于 2019-05-22 | 分类于 java-spring

https://github.com/mindhaq/restapi-versioning-spring.git
https://github.com/augusto/restVersioning.git

这两个git项目里提供了4种在springmvc中进行api版本控制的处理方法。

  1. /api/v1/xxx
    controller中的方法注解写法:

    1
    2
    3
    4
    5
    @ResponseBody
    @RequestMapping(value = "/apiurl/{version}/hello", method = GET, produces = APPLICATION_JSON_VALUE)
    public Hello sayHelloWorldUrl(@PathVariable final ValidVersion version) {
    return new Hello();
    }
  2. /api/xxx
    在header中添加”X-API-Version”:”v1”来进行版本请求的区别
    controller中的方法注解写法:

    1
    2
    3
    4
    5
    @ResponseBody
    @RequestMapping(value = "/apiheader/hello", method = GET, produces = APPLICATION_JSON_VALUE)
    public Hello sayHelloWorldHeader(@RequestHeader("X-API-Version") final ValidVersion version) {
    return new Hello();
    }
  3. /api/xxx
    在header中添加Accept: “application/vnd.company.app-v1+json”来进行版本区别
    controller中的方法注解写法:

    1
    2
    3
    4
    5
    @ResponseBody
    @RequestMapping(
    value = "/apiaccept/hello", method = GET,
    produces = {"application/vnd.company.app-v1+json", "application/vnd.company.app-v2+json"}
    )
  4. /api/xxx
    在header中添加Accept: “application/vnd.company.app-v1+json”来进行版本区别
    controller写法:

    1
    2
    3
    4
    5
    6
    7
    8
    9
    10
    11
    12
    13
    14
    15
    16
    17
    18
    @Controller
    @VersionedResource(media = "application/vnd.app.resource")
    public class TestController {

    @RequestMapping(value = {"/resource"}, method = RequestMethod.GET)
    @VersionedResource(from = "1.0", to = "1.0")
    @ResponseBody
    public Resource getResource_v1() {
    return new Resource("1.0");
    }

    @RequestMapping(value = {"/resource"}, method = RequestMethod.GET)
    @VersionedResource(from = "2.0")
    @ResponseBody
    public Resource getResource_v2_onwards() {
    return new Resource("2.0");
    }
    }

centos6环境下配置mysql主从同步

发表于 2016-04-25 | 更新于 2019-05-22 | 分类于 deploy

1、主从服务器分别作以下操作:

1.1、版本一致
1.2、初始化表,并在后台启动mysql
1.3、修改root的密码

2、修改主服务器master:

#vi /etc/my.cnf
[mysqld]
log-bin=mysql-bin //[必须]启用二进制日志
server-id=222 //[必须]服务器唯一ID,默认是1,一般取IP最后一段

3、修改从服务器slave:

#vi /etc/my.cnf
[mysqld]
log-bin=mysql-bin //[不是必须]启用二进制日志
server-id=226 //[必须]服务器唯一ID,默认是1,一般取IP最后一段

4、重启两台服务器的mysql

/etc/init.d/mysql restart
or:
service mysqld restart

5、在主服务器上建立帐户并授权slave:

#mysql -uroot -proot
mysql>GRANT REPLICATION SLAVE ON . to ‘mysync‘@’%’ identified by ‘root’; //一般不用root帐号,%表示所有客户端都可能连,只要帐号,密码正确,此处可用具体客户端IP代替,如192.168.145.226,加强安全。

6、登录主服务器的mysql,查询master的状态

mysql>show master status;
+——————+———-+————–+——————+
| File | Position | Binlog_Do_DB | Binlog_Ignore_DB |
+——————+———-+————–+——————+
| mysql-bin.000004 | 308 | | |
+——————+———-+————–+——————+
1 row in set (0.00 sec)
注:执行完此步骤后不要再操作主服务器MYSQL,防止主服务器状态值变化

7、配置从服务器Slave:

mysql>change master to master_host=’192.168.145.222’,master_user=’mysync’,master_password=’root’, master_log_file=’mysql-bin.000004’,master_log_pos=308; //注意不要断开,308数字前后无单引号。

Mysql>start slave; //启动从服务器复制功能

8、检查从服务器复制功能状态:

mysql> show slave status\G

*** 1. row ***

Slave_IO_State: Waiting for master to send event
Master_Host: 192.168.2.222  //主服务器地址
Master_User: mysync   //授权帐户名,尽量避免使用root
Master_Port: 3306    //数据库端口,部分版本没有此行
Connect_Retry: 60
Master_Log_File: mysql-bin.000004
Read_Master_Log_Pos: 600     //#同步读取二进制日志的位置,大于等于Exec_Master_Log_Pos
Relay_Log_File: ddte-relay-bin.000003
Relay_Log_Pos: 251
Relay_Master_Log_File: mysql-bin.000004
Slave_IO_Running: Yes    //此状态必须YES
Slave_SQL_Running: Yes     //此状态必须YES
      ......

注:Slave_IO及Slave_SQL进程必须正常运行,即YES状态,否则都是错误的状态(如:其中一个NO均属错误)。

以上操作过程,主从服务器配置完成。

centos6下安装配置mysql,并开启mysql的远程登录

发表于 2016-04-25 | 更新于 2019-05-22 | 分类于 deploy

安装:

查看是否已安装mysql:

yum list installed | grep mysql

如果已安装,如下一次卸载:

yum -y remove mysql-libs.x86_64

查看可用mysql:

yum list | grep mysql 或 yum -y list mysql*

安装mysql:

yum -y install mysql-server mysql mysql-devel

查看已安装的mysql状态:

rpm -qi mysql-server

安装后一开始登陆不上的问题:在进入mysql工具时,总是有错误提示:

mysql -u root -p
Enter password:
ERROR 1045 (28000): Access denied for user ‘root‘@’localhost’ (using password: NO)

解决:方法操作很简单,如下:

/etc/init.d/mysql stop
mysqld_safe –user=mysql –skip-grant-tables –skip-networking &
mysql -u root mysql
mysql> UPDATE user SET Password=PASSWORD(‘root’) where USER=’root’ and host=’root’ or host=’localhost’;//把空的用户密码都修改成非空的密码就行了。
mysql> FLUSH PRIVILEGES;
mysql> quit
/etc/init.d/mysqld restart
mysql -uroot -p
Enter password: <输入新设的密码newpassword>

开启远程连接

设置任意ip可以使用root账户和root密码远程登录

grant all privileges on . to root@’%’ identified by “root”;

刷新

FLUSH PRIVILEGES;

重启:

service mysqld restart

done!

[springboot+shiro+redis+rediscluster+sso]在springboot项目中接入shiro

发表于 2016-04-09 | 更新于 2019-05-22 | 分类于 java-spring

在之前的文章中,分别介绍了springboot启动,在springboot中使用redis作为缓存,在springboot中使用jpa和mybatis,现在将开始一个更大的综合工程:一步步介绍在springboot中使用shiro+redis-cluster+cookie实现一个跨域单点登录的方案。

现在开始是第一篇:在springboot项目中接入shiro

引入shiro的maven依赖

1
2
3
4
5
6
7
8
9
10
11
12
13
14
15
16
17
18
19
20
<dependency>
<groupId>org.apache.shiro</groupId>
<artifactId>shiro-core</artifactId>
<version>1.2.3</version>
</dependency>
<dependency>
<groupId>org.apache.shiro</groupId>
<artifactId>shiro-spring</artifactId>
<version>1.2.3</version>
</dependency>
<dependency>
<groupId>org.apache.shiro</groupId>
<artifactId>shiro-web</artifactId>
<version>1.2.3</version>
</dependency>
<dependency>
<groupId>org.apache.shiro</groupId>
<artifactId>shiro-ehcache</artifactId>
<version>1.2.3</version>
</dependency>

程序具体实现

首先,需要一个shiro的配置文件,这里使用的是ymal配置。配置文件:application.yml

1
2
3
4
5
6
7
8
9
10
11
shiro:
realm: com.xxx.xxx.config.security.MyRealm
loginUrl: /view/sign-in.html
successUrl: /item.html
unauthorizedUrl: /forbidden.html
filterChainDefinitions:
"/login": anon
"/static/**": anon
"/bower_components/**": anon
"/logout": logout
"/**": authc

说明:
realm: com.xxx.xxx.config.security.MyRealm
Realm,在shiro中相当于数据源,shiro的其他核心组件需要获取用户和认证数据,就是从Realm获取。
为了获得更好的自定义功能,通常我们会自己实现一个Realm.
所以这里使用realm: com.xxx.xxx.config.security.MyRealm配置了一个自定义的Realm。
loginUrl,定义了需要认证用户时,跳转到的登录页面
successUrl,定义登录成功后跳转的页面。通常也可以在自己登录认证方法里redirect到需要的页面。
unauthorizedUrl,定义未认证时显示的页面。
filterChainDefinitions,定义哪些路径应该做何种过滤策略。
anon,logout,authc这些都是shiro默认实现的过滤器filter。
anon表示可以匿名访问的路径,authc表示需要登录认证的路径

过滤器链使用最先匹配返回策略,所以我们需要把不需要认证即可访问的路径放在前面。

下面是自己实现的自定义Realm:MyRealm

1
2
3
4
5
6
7
8
9
10
11
12
13
14
15
16
17
18
19
20
21
22
23
24
25
26
27
28
29
30
31
32
33
34
35
36
37
38
import org.apache.shiro.authc.AuthenticationException;
import org.apache.shiro.authc.AuthenticationInfo;
import org.apache.shiro.authc.AuthenticationToken;
import org.apache.shiro.authc.SimpleAuthenticationInfo;
import org.apache.shiro.authc.UsernamePasswordToken;
import org.apache.shiro.authz.AuthorizationInfo;
import org.apache.shiro.authz.SimpleAuthorizationInfo;
import org.apache.shiro.realm.AuthorizingRealm;
import org.apache.shiro.subject.PrincipalCollection;
import org.springframework.beans.factory.annotation.Autowired;

import com.xxx.model.base.UserDTO;
import com.xxx.remote.base.UserRemote;

public class MyRealm extends AuthorizingRealm {
@Autowired UserRemote userService;

@Override
protected AuthorizationInfo doGetAuthorizationInfo(PrincipalCollection principals) {
UserDTO user = (UserDTO) principals.getPrimaryPrincipal();
SimpleAuthorizationInfo info = new SimpleAuthorizationInfo();
List<String> roles = userService.findByUserId(user.getId());
info.addRoles(roles);
return info;
}

@Override
protected AuthenticationInfo doGetAuthenticationInfo(AuthenticationToken token) throws AuthenticationException {
UsernamePasswordToken usernamePasswordToken = (UsernamePasswordToken) token;
String username = usernamePasswordToken.getUsername();
UserDTO user = userService.findUserByName(username);
if (null != user) {
CredentialsInfoHolder cih = new CredentialsInfoHolder(user.getPassword(), user.getSalt());
return new SimpleAuthenticationInfo(user, cih, getName());
}
return null;
}
}

MyRealm集成AuthorizingRealm,需要重写AuthorizingRealm的两个方法:doGetAuthorizationInfo,doGetAuthenticationInfo。
AuthorizationInfo represents a single Subject’s stored authorization data (roles, permissions, etc) used during authorization (access control) checks only.

doGetAuthorizationInfo方法返回一个AuthorizationInfo,AuthorizationInfo对象是一个单一的Subject对象,存储着用户的授权数据,只用于授权检查时使用。
doGetAuthenticationInfo方法,针对给定的用户,获取对应用户的认证数据,提供给认证用户身份时使用。

例子中UserRemote userService是提供用户数据的具体service服务。

有了数据源realm和shiro配置文件,现在开始接入shiro配置到spring容器

springboot shiro配置类:ShiroAutoConfig.java

1
2
3
4
5
6
7
8
9
10
11
12
13
14
15
16
17
18
19
20
21
22
23
24
25
26
27
28
29
30
31
32
33
34
35
36
37
38
39
40
41
42
43
44
45
46
47
import org.apache.shiro.mgt.DefaultSecurityManager;
import org.apache.shiro.realm.Realm;
import org.apache.shiro.spring.web.ShiroFilterFactoryBean;
import org.springframework.beans.BeanUtils;
import org.springframework.beans.factory.annotation.Autowired;
import org.springframework.boot.autoconfigure.condition.ConditionalOnMissingBean;
import org.springframework.boot.context.properties.EnableConfigurationProperties;
import org.springframework.context.annotation.Bean;
import org.springframework.context.annotation.Configuration;
import org.springframework.context.annotation.DependsOn;
import org.springframework.context.annotation.Import;

import com.xxx.xxx.config.security.MyRealm;

@Configuration
@EnableConfigurationProperties(ShiroProperties.class)
@Import(ShiroManager.class)
public class ShiroAutoConfig {
@Autowired private ShiroProperties properties;

@Bean(name = "realm")
@DependsOn("lifecycleBeanPostProcessor")
@ConditionalOnMissingBean
public MyRealm realm() {
Class<?> relmClass = properties.getRealm();
MyRealm r = (MyRealm) BeanUtils.instantiate(relmClass);
HashedCredentialsMatcher credentialsMatcher = new HashedCredentialsMatcher();
credentialsMatcher.setHashAlgorithmName(Sha256Hash.ALGORITHM_NAME);
r.setCredentialsMatcher(credentialsMatcher);
return r;
}

@Bean(name = "shiroFilter")
@DependsOn("securityManager")
@ConditionalOnMissingBean
public ShiroFilterFactoryBean getShiroFilterFactoryBean(DefaultSecurityManager securityManager, Realm realm) {
MyRealm myRealm = (MyRealm) realm;
securityManager.setRealm(myRealm);
ShiroFilterFactoryBean shiroFilter = new ShiroFilterFactoryBean();
shiroFilter.setSecurityManager(securityManager);
shiroFilter.setLoginUrl(properties.getLoginUrl());
shiroFilter.setSuccessUrl(properties.getSuccessUrl());
shiroFilter.setUnauthorizedUrl(properties.getUnauthorizedUrl());
shiroFilter.setFilterChainDefinitionMap(properties.getFilterChainDefinitions());
return shiroFilter;
}
}

这里例子里说明,我们需要提供realm和shiroFilter两个bean配置给spring容器。
getShiroFilterFactoryBean方法返回ShiroFilterFactoryBean,将会把yml里面的配置读取到ShiroFilterFactoryBean中,然后把realm设置进securityManager。
yml配置有ShiroProperties类持有并提供给ShiroFilterFactoryBean。
当然,还需要配置几个其他配置,都在ShiroManager配置好了。

ShiroProperties:

1
2
3
4
5
6
7
8
9
10
11
12
13
14
import java.util.Map;
import org.springframework.boot.context.properties.ConfigurationProperties;
/**
* Configuration properties for Shiro.
*/
@ConfigurationProperties(prefix = "shiro")
public class ShiroProperties {
private Class<?> realm;
private String loginUrl;
private String successUrl;
private String unauthorizedUrl;
private Map<String, String> filterChainDefinitions;

}

ShiroManager:

1
2
3
4
5
6
7
8
9
10
11
12
13
14
15
16
17
18
19
20
21
22
23
24
25
26
27
28
29
30
31
32
33
34
35
36
37
38
39
40
41
42
43
44
45
46
47
48
49
50
51
52
53
54
55
56
57
import org.apache.shiro.cache.CacheManager;
import org.apache.shiro.mgt.DefaultSecurityManager;
import org.apache.shiro.session.mgt.SessionManager;
import org.apache.shiro.session.mgt.eis.SessionDAO;
import org.apache.shiro.spring.LifecycleBeanPostProcessor;
import org.apache.shiro.spring.security.interceptor.AuthorizationAttributeSourceAdvisor;
import org.apache.shiro.web.mgt.DefaultWebSecurityManager;
import org.apache.shiro.web.session.mgt.DefaultWebSessionManager;
import org.springframework.aop.framework.autoproxy.DefaultAdvisorAutoProxyCreator;
import org.springframework.boot.autoconfigure.condition.ConditionalOnMissingBean;
import org.springframework.context.annotation.Bean;
import org.springframework.context.annotation.DependsOn;

/**
* Shiro Config Manager.
*/
public class ShiroManager {
/**
* 保证实现了Shiro内部lifecycle函数的bean执行
*/
@Bean(name = "lifecycleBeanPostProcessor")
@ConditionalOnMissingBean
public LifecycleBeanPostProcessor lifecycleBeanPostProcessor() {
return new LifecycleBeanPostProcessor();
}
@Bean(name = "defaultAdvisorAutoProxyCreator")
@ConditionalOnMissingBean
@DependsOn("lifecycleBeanPostProcessor")
public DefaultAdvisorAutoProxyCreator defaultAdvisorAutoProxyCreator() {
DefaultAdvisorAutoProxyCreator defaultAdvisorAutoProxyCreator = new DefaultAdvisorAutoProxyCreator();
defaultAdvisorAutoProxyCreator.setProxyTargetClass(true);
return defaultAdvisorAutoProxyCreator;

}
/**
* 用户授权信息Cache
*/
@Bean(name = "cacheManager")
@ConditionalOnMissingBean
public CacheManager cacheManager() {
return new MemoryConstrainedCacheManager();
}
@Bean(name = "securityManager")
@ConditionalOnMissingBean
public DefaultSecurityManager securityManager(CacheManager cacheManager) {
DefaultSecurityManager sm = new DefaultWebSecurityManager();
sm.setCacheManager(cacheManager);
return sm;
}
@Bean
@ConditionalOnMissingBean
public AuthorizationAttributeSourceAdvisor getAuthorizationAttributeSourceAdvisor(DefaultSecurityManager securityManager) {
AuthorizationAttributeSourceAdvisor aasa = new AuthorizationAttributeSourceAdvisor();
aasa.setSecurityManager(securityManager);
return new AuthorizationAttributeSourceAdvisor();
}
}

CacheManager负责缓存,这里简单的使用默认的内存缓存管理MemoryConstrainedCacheManager。
如果需要ehcache,或者使用redis作为缓存,则只需要实现自己的CacheManager和SessionManager即可。

至此,springboot中引入shiro就完成了,其他更多具体使用方法,根据具体而定。

这里简单的提供一下在mvc的controller中做登录和登出怎么做。

LoginController:

1
2
3
4
5
6
7
8
9
10
11
12
13
14
15
16
17
18
19
20
21
22
23
24
25
26
27
28
29
30
31
32
33
34
35
36
37
38
39
40
41
42
43
44
45
46
47
48
import javax.servlet.ServletException;
import javax.servlet.http.HttpServletRequest;
import javax.servlet.http.HttpServletResponse;

import org.apache.shiro.SecurityUtils;
import org.apache.shiro.authc.AuthenticationException;
import org.apache.shiro.authc.IncorrectCredentialsException;
import org.apache.shiro.authc.UnknownAccountException;
import org.apache.shiro.authc.UsernamePasswordToken;
import org.apache.shiro.subject.Subject;
import org.springframework.stereotype.Controller;
import org.springframework.web.bind.annotation.RequestMapping;
import org.springframework.web.bind.annotation.ResponseBody;

@Controller
public class LoginController {
@RequestMapping("/login")
@ResponseBody
public void login(HttpServletRequest req, HttpServletResponse resp, String username, String password) throws ServletException, IOException {
Subject subject = SecurityUtils.getSubject();
String error = null;
UsernamePasswordToken token = new UsernamePasswordToken(username, password);
try {
subject.login(token);
} catch (UnknownAccountException e) {
error = "用户名/密码错误";
} catch (IncorrectCredentialsException e) {
error = "用户名/密码错误";
} catch (AuthenticationException e) {
// 其他错误,比如锁定,如果想单独处理请单独catch处理
error = "其他错误:" + e.getMessage();
}
if (error != null) {// 出错了,返回登录页面
req.setAttribute("error", error);
resp.sendRedirect("/forbidden.html");
} else {// 登录成功
resp.sendRedirect("/index.html");// 设置跳转的页面
}
}
@RequestMapping(value = "/logout")
@ResponseBody
public void logout(HttpServletRequest req, HttpServletResponse resp) throws IOException {

Subject currentUser = SecurityUtils.getSubject();
currentUser.logout();
resp.sendRedirect("/index.html");
}
}

done!

[springboot]在spring项目中连接数据库以及spring-datajpa和mybatis的使用

发表于 2016-04-09 | 更新于 2019-05-22 | 分类于 java-spring

1.在项目中添加数据库配置(添加数据源等配置)

spring boot推崇约定大于配置,即是说,即使你什么也配置,spring boot也会为你添加一些约定俗成的默认配置。
比如数据源dataSource就是,如果你的spring boot项目没有数据源配置,那么默认情况下项目启动会失败,提示你配置数据源。
如果你的项目真的不需要数据源,没有数据库url等配置,那么你需要显式的使用注解配置告诉spring boot。
在启动类添加注解:
@EnableAutoConfiguration(exclude = {DataSourceAutoConfiguration.class, HibernateJpaAutoConfiguration.class}

回到数据源配置上来。
首先,在配置文件application.properties里面配置数据库url

1
2
3
4
spring.datasource.url=jdbc:mysql://localhost/dbname
spring.datasource.username=username
spring.datasource.password=password
spring.datasource.driver-class-name=com.mysql.jdbc.Driver

使用mysql数据库,还需要添加maven依赖

1
2
3
4
<dependency>
<groupId>mysql</groupId>
<artifactId>mysql-connector-java</artifactId>
</dependency>

然后,添加数据库配置类

1
2
3
4
5
6
7
8
9
10
11
12
13
14
15
16
17
18
19
20
import javax.sql.DataSource;
import org.apache.ibatis.session.ExecutorType;
import org.apache.ibatis.session.SqlSessionFactory;
import org.mybatis.spring.SqlSessionFactoryBean;
import org.mybatis.spring.SqlSessionTemplate;
import org.mybatis.spring.annotation.MapperScan;
import org.springframework.boot.autoconfigure.condition.ConditionalOnMissingBean;
import org.springframework.context.annotation.Bean;
import org.springframework.context.annotation.Configuration;
import org.springframework.core.io.ClassPathResource;

@Configuration
public class DatabaseConfig {
@Bean
public SqlSessionFactory sqlSessionFactory(DataSource dataSource) throws Exception {
final SqlSessionFactoryBean sessionFactory = new SqlSessionFactoryBean();
sessionFactory.setDataSource(dataSource);
return sessionFactory.getObject();
}
}

如此,项目中就有了数据源

2.在项目中使用spring-data-jpa

添加maven依赖:

1
2
3
4
<dependency>
<groupId>org.springframework.boot</groupId>
<artifactId>spring-boot-starter-data-jpa</artifactId>
</dependency>

添加Repository类:

1
2
3
4
5
6
7
8
9
10
11
12
13
import org.springframework.data.domain.Page;
import org.springframework.data.domain.Pageable;
import org.springframework.data.repository.CrudRepository;

import com.xxx.xxx.model.User;

public interface UserRepository extends CrudRepository<User, Long> {

Page<User> findAll(Pageable pageable);
Page<User> findByNameContainingAndTypeContainingAllIgnoringCase(String name, Integer type, Pageable pageable);
User findByNameAndTypeAllIgnoringCase(String name, Integer type);
User findByName(String name);
}

pring-data-jpa的使用极其简单,只需要配置好对应的Repository接口即可,不需要操作的具体实现
这个例子中,UserRepository继承了CrudRepository,默认即拥有基础的增删改查接口。
然后你只需添加一些你需要的额外接口方法。
同样你只需按照其约定的方式写好接口方法,而不需要具体实现。

使用:
在需要的地方注解注入即可。
@Autowrite UserRepository userRepository;

3.在项目中使用mybatis

添加maven依赖:

1
2
3
4
5
6
7
8
9
10
<dependency>
<groupId>org.mybatis</groupId>
<artifactId>mybatis</artifactId>
<version>3.2.3</version>
</dependency>
<dependency>
<groupId>org.mybatis</groupId>
<artifactId>mybatis-spring</artifactId>
<version>1.2.2</version>
</dependency>

mybatis的使用,和jpa一样,默认也是只需要定义Mapper接口即可,不需要实现类,但需要具体实现的sql。
你可以使用xml写sql,或者在接口上面使用注解注入sql两种方式。

注解sql例子:

1
2
3
4
public interface ItemMapper {
@Select("select * from item")
List<Item> findAll();
}

而如果是xml配置文件的话,则需要mapper xml中的sql id和Mapper接口中的接口方法名称一致。

当然,如果习惯了使用具体实现,使用SqlSessionTemplate,也可以实现。
首先需要改一下DatabaseConfig配置类:

1
2
3
4
5
6
7
8
9
10
11
12
13
14
15
16
17
18
19
20
21
22
23
24
25
26
27
import javax.sql.DataSource;
import org.apache.ibatis.session.ExecutorType;
import org.apache.ibatis.session.SqlSessionFactory;
import org.mybatis.spring.SqlSessionFactoryBean;
import org.mybatis.spring.SqlSessionTemplate;
import org.mybatis.spring.annotation.MapperScan;
import org.springframework.boot.autoconfigure.condition.ConditionalOnMissingBean;
import org.springframework.context.annotation.Bean;
import org.springframework.context.annotation.Configuration;
import org.springframework.core.io.ClassPathResource;

@Configuration
@MapperScan(basePackages="com.xxx.xxx.mapper")
public class DatabaseConfig {
@Bean
public SqlSessionFactory sqlSessionFactory(DataSource dataSource) throws Exception {
final SqlSessionFactoryBean sessionFactory = new SqlSessionFactoryBean();
sessionFactory.setDataSource(dataSource);
sessionFactory.setConfigLocation(new ClassPathResource("mybatis-config.xml"));
return sessionFactory.getObject();
}
@Bean
@ConditionalOnMissingBean
public SqlSessionTemplate sqlSessionTemplate(SqlSessionFactory sqlSessionFactory) {
return new SqlSessionTemplate(sqlSessionFactory, ExecutorType.SIMPLE);
}
}

添加mybatis配置文件:

1
2
3
4
5
6
7
8
9
10
11
12
<?xml version="1.0" encoding="UTF-8" ?>
<!DOCTYPE configuration
PUBLIC "-//mybatis.org//DTD Config 3.0//EN"
"http://mybatis.org/dtd/mybatis-3-config.dtd">
<configuration>
<typeAliases>
<package name="com.xxx.xxx.model"/>
</typeAliases>
<mappers>
<mapper resource="mapper/xxxMapper.xml"/>
</mappers>
</configuration>

具体Mapper实现类:

1
2
3
4
5
6
7
8
@Component
public class ItemMapper {
@Autowired private SqlSessionTemplate sqlSessionTemplate;

public Item selectItemById(long id) {
return this.sqlSessionTemplate.selectOne("selectItemById", id);
}
}

done!

1…6789
Wanglv Yihua

Wanglv Yihua

82 日志
20 分类
206 标签
RSS
© 2019 Wanglv Yihua
由 Hexo 强力驱动 v3.9.0
|
主题 – NexT.Muse v6.4.1