[Jenkins自动化部署实践]Jenkins多环境部署git托管的springboot项目
目标
场景
Jenkins部署在服务器192.168.1.119:8080.
有一个在git托管的springboot构建的web项目,项目有n个依赖的父模块,现在想要把这个项目部署到服务器192.168.1.134上.
现在,我们需要使用Jenkins自动化部署实现这个目标.
为什么是springboot?
Sprinboot允许项目使用内嵌的tomcat像启动普通java程序一样启动一个web项目.由于有了这个特性,项目不再需要打war包部署到tomcat,而是打成jar包,直接使用java -jar命令启动.
如何实现?
1-需要在jenkins上建立n个maven项目打包任务,项目有多少个依赖的父模块,就建多少个。build。
2-建立目标项目的maven打包项目。build。
3-建立一个自由软件风格任务,作用是使用shell脚本,登录到目标服务器192.168.1.134,执行134上的shell脚本,从Jenkins所在的服务器cp目标jar包,拉取打包好的jar到134,然后启动jar。
实现步骤
下面是具体操作
1-需要在jenkins上建立n个maven项目打包任务,项目有多少个依赖的父模块,就建多少个。build。
由于要区分不同的部署环境,所以这里先建一个dev环境的项目组
建立maven打包任务,为项目所依赖的父模块建立编译打包任务
主要填好项目任务名称和项目git地址即可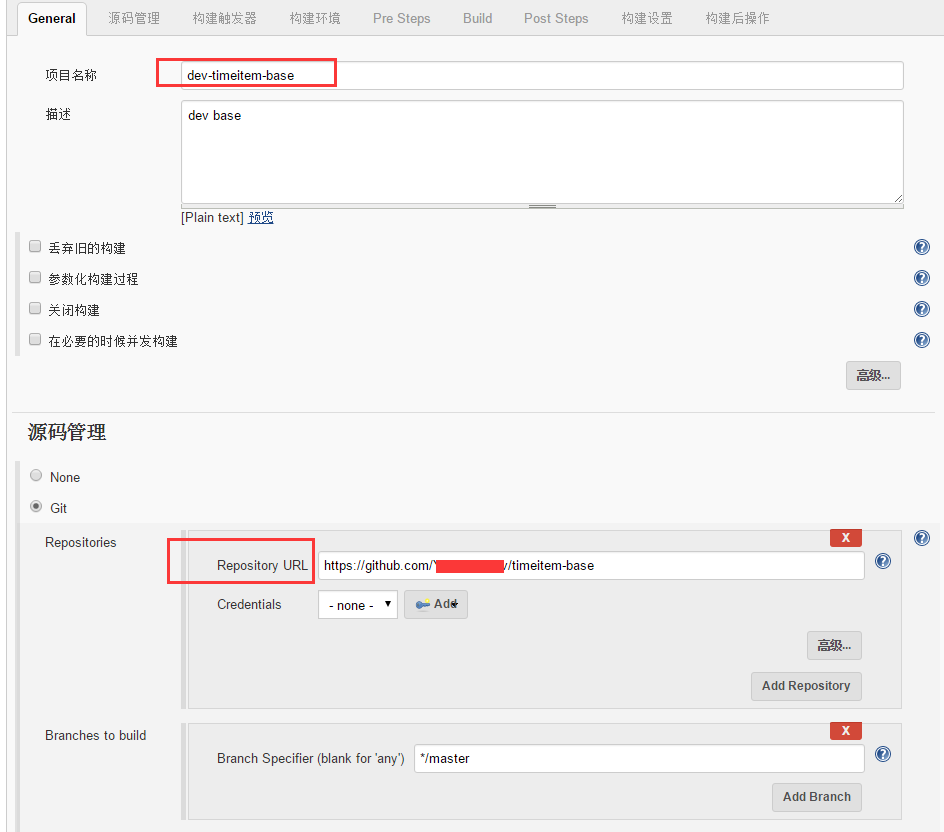
2-建立目标项目的maven打包项目。build。
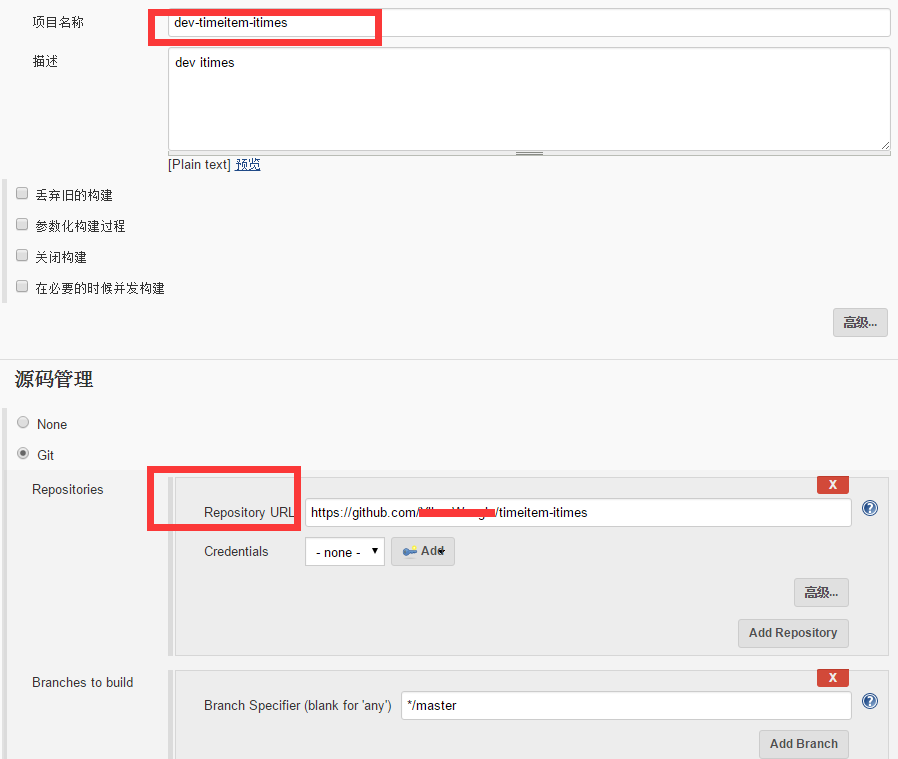
由于我们要实现不同部署环境区分不同配置,所以我们需要对项目做些额外的工作
首先在maven pom中添加profiles设置。我这里添加了3个环境local,dev和prod1
2
3
4
5
6
7
8
9
10
11
12
13
14
15
16
17
18
19
20
21
22
23<profiles>
<profile>
<id>local</id>
<activation>
<activeByDefault>true</activeByDefault>
</activation>
<properties>
<env>local</env>
</properties>
</profile>
<profile>
<id>dev</id>
<properties>
<env>dev</env>
</properties>
</profile>
<profile>
<id>prod</id>
<properties>
<env>prod</env>
</properties>
</profile>
</profiles>
然后,添加maven-resources-plugin插件,这个插件会为我们复制生成三个环境的配置文件目录。1
2
3
4
5
6
7
8
9
10
11
12
13
14
15
16
17
18
19
20
21
22
23
24
25
26
27
28
29
30
31
32
33<plugin>
<artifactId>maven-resources-plugin</artifactId>
<executions>
<execution>
<id>copy-prod-resources</id>
<phase>process-resources</phase>
<goals>
<goal>copy-resources</goal>
</goals>
<configuration>
<!-- this is important -->
<overwrite>true</overwrite>
<sourceDirectory>${basedir}/src/main/java</sourceDirectory>
<outputDirectory>target/classes</outputDirectory>
<resources>
<resource>
<directory>src/main/resources</directory>
<includes>
<include>*.properties</include>
<include>*.xml</include>
</includes>
</resource>
<resource>
<directory>src/main/resources/${env}</directory>
<targetPath></targetPath>
</resource>
</resources>
<testSourceDirectory>${basedir}/src/test/java</testSourceDirectory>
<testOutputDirectory>target/test-classes</testOutputDirectory>
</configuration>
</execution>
</executions>
</plugin>
这样就会在resources目录下生成三个不同环境的目录和配置文件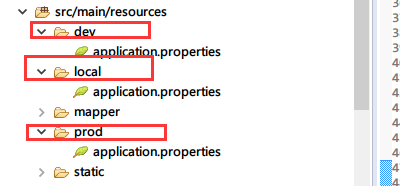
如果是cli命令行下,我们就可以使用mvn install -P$env命令打包不同环境的配置
如dev环境就是mvn install -Pdev
但是我们现在不是命令行,而是使用Jenkins做编译打包。
于是,添加的Jenkins任务,除了任务名称和git地址外,还需要额外多一个配置。
在“Build”标签下,填写“goals and options”字段,值为“clean install -Pdev”。
-Pdev表示我们要打的正是dev环境的配置
3-建立一个自由软件风格任务,作用是使用shell脚本,登录到目标服务器192.168.1.134,执行134上的shell脚本,从Jenkins所在的服务器cp目标jar包,拉取打包好的jar到134,然后启动jar。
由于我们需要执行远程服务器上的shell脚本,所以我们必须要让Jenkins知道远程服务器的ssh登录方法。
要让Jenkins能登录服务器做远程任务,我们需要在全局配置中配置好“SSH remote host”。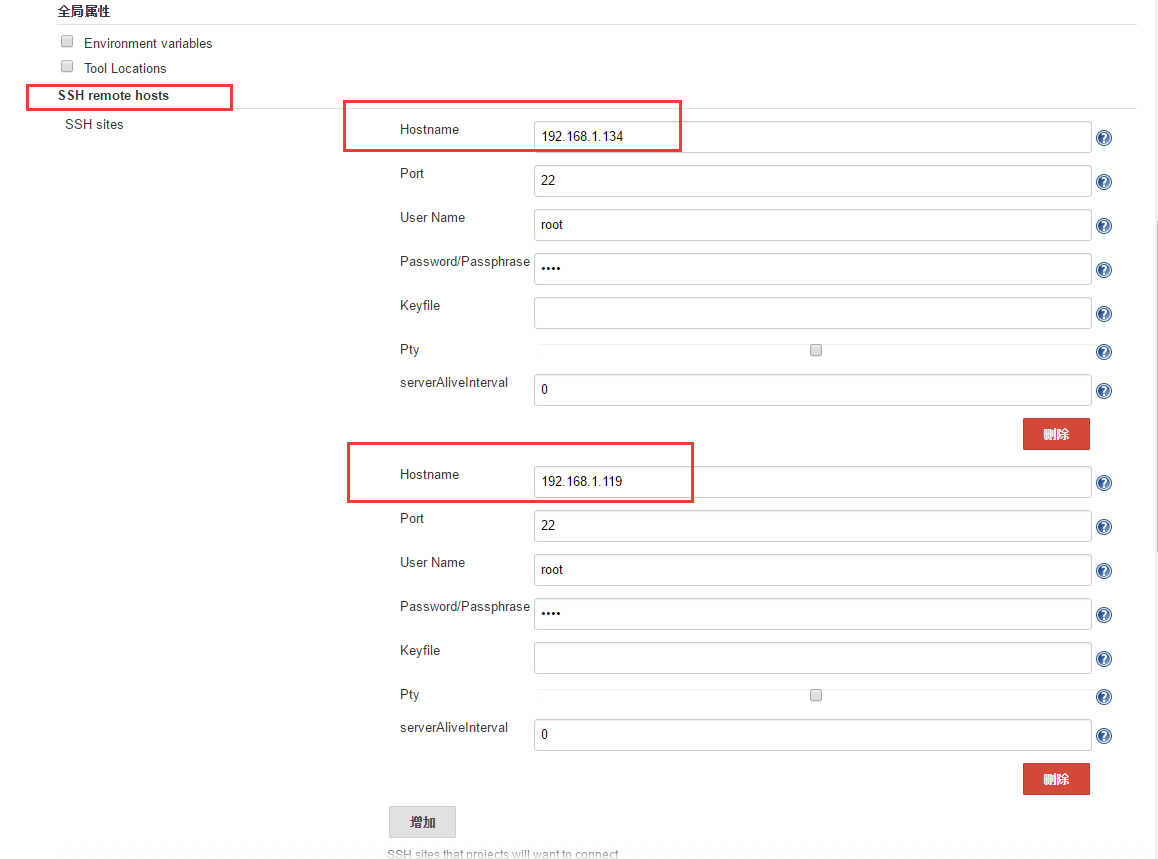
然后配置一个执行远程shell脚本的任务,如下图。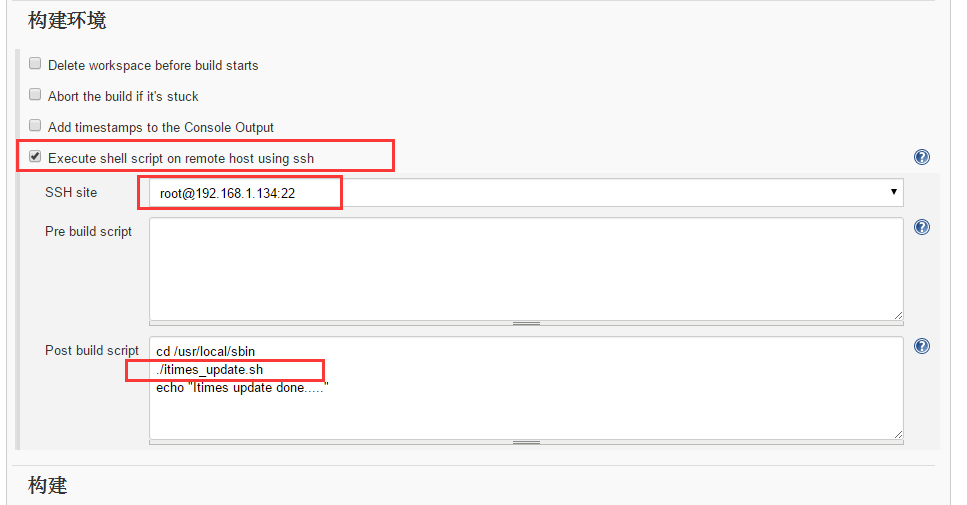
这个脚本很简单,只是设置好要登录的服务器,在shell中进入shell脚本所在目录,直接执行目标脚本。
而拉取jar包并更新启动springboot项目的任务则有远程脚本所承包了。
任务脚本例子:
这个shell脚本主要做了几件事:
1)使用sshpass和scp从119服务器远程复制打包好的jar包回来134,备份,再复制到项目定好的目标路径
2)kill关闭原java进程
3)使用nohup java -jar ${target_path}/${target_jar} < /dev/null > ${target_bak_path}/${now}/itime-${now}.log 2>&1 &
启动java程序,并把日志输出到指定的log文件。
4)检查java程序是否启动成功。1
2
3
4
5
6
7
8
9
10
11
12
13
14
15
16
17
18
19
20
21
22
23
24
25
26
27
28
29
30
31
32
33
34
35
36
37
38
39
40
41
42
43
44
45
46
47
48
49
50
51
52
53
54
55
56
57
58
59
60
61
62
63
64
65
66
67
68
69
70
71
72
73
74
75
76#!/bin/bash
# script to update and restart project itimes
remote_source_path=/root/.jenkins/workspace/dev-timeitem-itimes/target
target_jar=itimes-1.0.0-SNAPSHOT.jar
target_path=/usr/local/itimes
target_bak_path=/usr/local/itimes_bak
now=$(date '+%Y%m%d%H%M%S')
echo "update and restart project itimes start..."
echo "now time: ${now}"
mkdir -p ${target_bak_path}/${now}
/usr/bin/sshpass -p "root" scp root@192.168.1.119:${remote_source_path}/itimes-1.0.0-SNAPSHOT.jar ${target_bak_path
}/${now}
cd $target_bak_path/$now
if [ -f ${target_jar} ]; then
pkill -f 'java.*itimes'
sleep 3
temppid=$(ps aux | grep java| grep "${target_jar}" | grep -v grep | awk '{ print $2}')
if [[ "$temppid" != "" ]]; then
echo "temppid is ${temppid}"
ps -ef | grep ${target_jar} | grep -v grep | awk '{print $2}' | xargs kill
fi
echo "kill ${target_jar} done.."
cd $target_path
if [ -f ${target_jar} ]; then
rm -f ${target_jar}
echo "target_jar deleted.."
else
echo "${target_jar} not exist, go on to copy.."
fi
cp ${target_bak_path}/${now}/${target_jar} ${target_path}
echo "cp done!"
chmod 755 ${target_jar}
nohup java -jar ${target_path}/${target_jar} < /dev/null > ${target_bak_path}/${now}/itime-${now}.log 2>&1 &
echo "app startting.."
for i in 2 4 6 10; do
sleep $i
echo "wait and check app starting up..."
APP_PID=`ps aux | grep java| grep "${target_jar}" | grep -v grep | awk '{ print $2}'`
if [ $APP_PID > 0 ]; then
break;
else
echo "app is still starting up..."
fi
done
pid=$(ps aux | grep java| grep "${target_jar}" | grep -v grep | awk '{ print $2}')
echo "app id is: ${pid}"
if [ $pid ]; then
echo "${target_jar} is running now!"
else
echo "${target_jar} is not running! ${target_jar} startup failed!"
fi
success_flag="false"
for i in 2 4 6 8 10 12; do
echo "checking app startup status..."
success_target_tag=`cat ${target_bak_path}/${now}/itime-${now}.log | grep "Started App in"`
if [[ "" != "$success_target_tag" ]]; then
echo "Found success target tag, app startup successfully.."
success_flag="true"
break;
else
echo "app is still starting up..."
sleep $i
echo "sleep $i ..."
fi
done
if [[ "true" != "$success_flag" ]]; then
echo "Not found success target tag, app startup failed..."
fi
else
echo "Target jar not exist! Update not complete!"
fi
echo "update done!"
done.